Introduction to iPhone Repairs
iPhones are known for their premium build, smooth performance, and longevity. However, like all electronic devices, they are not immune to damage and technical issues. Whether it’s a cracked screen, battery problems, or software glitches, understanding how to maintain and repair your iPhone can save you both time and money.
Table of Contents
Importance of Keeping Your iPhone in Good Condition
A well-maintained iPhone performs efficiently and lasts longer. Here are a few reasons why taking care of your device is crucial:
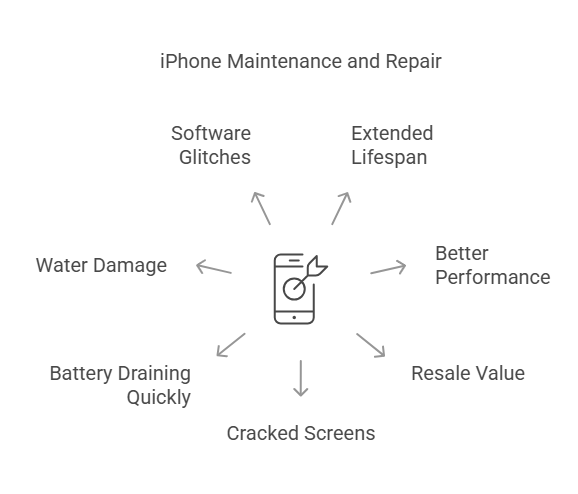
- Extended Lifespan: Proper maintenance reduces the need for frequent repairs.
- Better Performance: Regular updates and care ensure smooth functionality.
- Resale Value: A well-kept iPhone retains higher value if you plan to sell or trade it.
Common Issues iPhone Users Face
Even with the best care, iPhones can develop problems. Some of the most common issues include:
- Cracked Screens – A single drop can cause severe damage to the display.
- Battery Draining Quickly – Over time, batteries lose their capacity to hold a charge.
- Water Damage – Accidental spills or drops in water can affect internal components.
- Software Glitches – Apps crashing, freezing, or iOS update failures can disrupt usage
1. Cracked Screens
Cause: Accidental drops, high-impact collisions, or pressure on the screen.
Solution: Use a screen protector and a sturdy case to minimize damage. If cracked, screen replacement is necessary.
2. Battery Draining Quickly
Cause: Excessive background apps, high screen brightness, and aging battery.
Solution: Reduce screen brightness, close unused apps, and replace the battery if necessary.
3. Water Damage
Cause: Exposure to water, rain, or accidental drops in liquids.
Solution: Avoid exposing your phone to moisture. If water damage occurs, dry it immediately and seek professional repair.
4. Software Glitches
Cause: Outdated software, corrupt apps, or system overload.
Solution: Keep your iOS updated, remove problematic apps, and perform a factory reset if necessary.
DIY vs. Professional Repair: Which One is Better?
When your iPhone faces an issue, you may wonder whether to fix it yourself or seek professional help. Both options have pros and cons.
Pros and Cons of DIY Repairs
✅ Pros:
- Cost-Effective: DIY repairs can be cheaper than professional services.
- Convenience: You can fix minor issues at home without waiting for a technician.
- Learning Experience: Helps you understand your device better.
❌ Cons:
- Risk of Further Damage: One wrong step can worsen the issue.
- No Warranty Coverage: Apple may void the warranty if you attempt a DIY fix.
- Lack of Tools and Expertise: Some repairs require special tools and technical skills.
When to Seek Professional Help
- Severe damage: If the screen is shattered or internal parts are affected.
- Complex issues: Water damage, motherboard problems, or advanced software errors.
- Under warranty: If your iPhone is still covered, professional repair ensures quality service without extra costs.
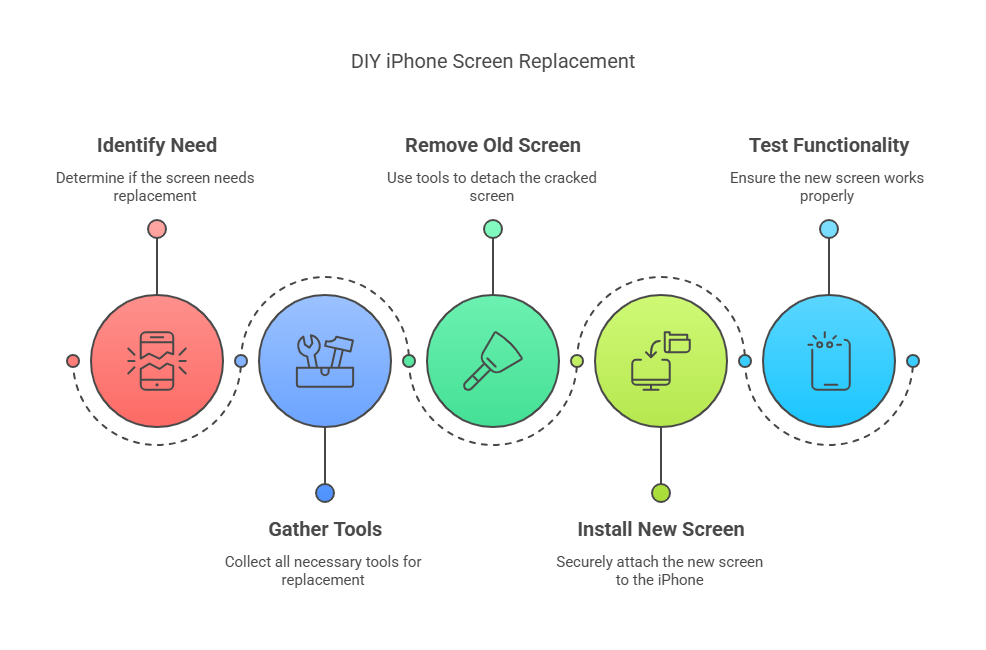
Step-by-Step Guide: How to Replace a Cracked iPhone Screen
If your iPhone screen is cracked and you decide to replace it yourself, follow these steps carefully.
Tools Needed:
- Replacement iPhone screen
- Small Phillips screwdriver
- Suction cup
- Plastic opening tool
- Tweezers
- Adhesive strips
Precautions to Take:
- Backup Your Data: Ensure all important files are saved.
- Work on a Clean Surface: Avoid losing tiny screws or parts.
- Disconnect the Battery: Prevent short circuits during repair.
Step-by-Step Process:
- Turn Off Your iPhone: Power it down completely.
- Remove Screws: Unscrew the bottom screws near the charging port.
- Use Suction Cup: Gently lift the screen using a suction cup.
- Disconnect Cables: Carefully detach the display cables.
- Replace the Screen: Attach the new screen and reconnect cables.
- Reassemble and Test: Secure the screen, tighten screws, and power on the phone to check functionality.
If unsure, seek professional help to avoid further damage.
How to Fix an iPhone That Won’t Charge
If your iPhone is not charging, here are some possible solutions.
1. Checking the Charging Cable and Adapter
- Use a Different Cable: Faulty cables can prevent charging.
- Check the Adapter: Try another adapter to rule out issues.
- Use an Official Charger: Third-party chargers may not work properly.
2. Cleaning the Charging Port
- Check for Dust and Debris: Use a flashlight to inspect the port.
- Clean Gently: Use a toothpick or soft brush to remove lint or dirt.
- Avoid Water or Sharp Objects: This could cause further damage.
3. When to Replace the Battery
- Battery Drains Quickly: A battery replacement may be needed.
- Device Overheats: Excess heat can indicate battery failure.
- Unexpected Shutdowns: If your iPhone shuts down randomly, a new battery might solve the issue.
- Best Practices for Extending iPhone Battery LifeYour iPhone’s battery health plays a vital role in its performance and longevity. By following a few best practices, you can extend its lifespan and avoid frequent charging issues.1. Adjusting Settings for Power Efficiency
- Lower Screen Brightness: Reduce brightness manually or enable “Auto-Brightness” in settings.
- Enable Low Power Mode: This feature limits background activity to extend battery life.
- Turn Off Background App Refresh: Disable unnecessary apps from refreshing in the background.
- Disable Location Services: Keep GPS on only for essential apps.
- Turn Off Unused Features: Disable Bluetooth, Wi-Fi, or AirDrop when not in use.
- Keep Your iPhone Cool: High temperatures (above 95°F/35°C) can permanently damage battery capacity.
- Avoid Cold Environments: Extreme cold can temporarily reduce battery performance.
- Do Not Charge in Direct Sunlight: Charging your iPhone under direct heat can overheat the battery.
- Battery Health Below 80%: Check battery health in “Settings > Battery > Battery Health & Charging.”
- iPhone Shuts Down Unexpectedly: This indicates a failing battery.
- Charging Takes Too Long: If charging is slow despite using an official Apple charger, a replacement may be needed.
- Turn Off Your iPhone Immediately: Prevents short circuits.
- Remove Any Accessories: Disconnect headphones, SIM card, and case.
- Dry the Exterior: Use a microfiber cloth to wipe excess moisture.
- Place in a Dry, Ventilated Area: Allow airflow to help drying.
- Do NOT Use a Hairdryer: Heat can damage internal components.
- Do NOT Shake the Device: This may spread the liquid inside.
- Do NOT Charge the iPhone: Plugging in a wet iPhone can cause further damage.
- Do NOT Put It in Rice: Contrary to popular belief, rice does not effectively absorb moisture and can leave dust particles inside.
- Visit an Apple Store or Repair Shop: If the iPhone does not turn on after drying for 24–48 hours.
- Water-Resistant iPhones Still Need Caution: Even if your iPhone is water-resistant (IP67 or IP68), prolonged exposure to liquids can still cause damage.
- Close and Restart the App: Swipe up and close the unresponsive app.
- Update the App: Go to the App Store and update the app to the latest version.
- Clear App Cache (if applicable): Some apps allow clearing cache in settings.
- Reinstall the App: If the issue persists, delete and reinstall the app.
- Check Storage Space: Ensure you have enough space for the update.
- Restart Your iPhone: A simple reboot can resolve update errors.
- Update Using a Computer: If OTA (Over-The-Air) updates fail, try updating via iTunes or Finder (Mac).
- Reset Network Settings: If downloads are stuck, go to “Settings > General > Transfer or Reset iPhone > Reset > Reset Network Settings.”
- Backup Your Data: Use iCloud or iTunes to save important files.
- Reset Your iPhone: Go to “Settings > General > Transfer or Reset iPhone > Erase All Content and Settings.”
- Restore from Backup or Set Up as New: After resetting, you can restore your data or start fresh.
- iFixit Pro Tech Toolkit: Includes precision screwdrivers, pry tools, and suction cups.
- Kaisi Precision Screwdriver Set: Great for opening iPhones and handling small parts.
- Wiha Precision Screwdrivers: High-quality tools for long-term use.
- Magnetic Project Mat: Helps keep screws organized during repairs.
- Official Apple Parts Store: Apple now sells official parts and tools for self-repair.
- iFixit: One of the best sources for repair tools and guides.
- Amazon & eBay: Be sure to check reviews before purchasing.
- Local Electronics Stores: Some specialized repair shops sell tools in-store.

Finding a Reliable iPhone Repair Service
If DIY repairs aren’t an option, finding a trustworthy repair shop is essential.
1. What to Look for in a Repair Shop
- Certified Technicians: Look for Apple-certified repair providers (Apple Authorized Service Providers).
- Use of Genuine Parts: Ensure they use original Apple parts or high-quality replacements.
- Good Customer Reviews: Check Google Reviews, Yelp, or social media feedback.
2. Cost Considerations
- Compare Prices: Get quotes from different repair shops to avoid overpaying.
- Check for Hidden Fees: Some shops charge extra for diagnosis or labor.
- AppleCare+ Coverage: If you have AppleCare+, repairs may be significantly cheaper.
3. Warranty and Guarantees Offered
- Warranty on Repairs: A good repair shop should offer at least a 30-90 day warranty on their work.
- Money-Back Guarantee: Some shops offer refunds if the repair isn’t successful.
- Apple’s Repair Program: If your iPhone is still under warranty, Apple can provide free or discounted repairs.
Conclusion
Whether you’re maintaining your iPhone’s battery, dealing with water damage, or troubleshooting software issues, proper knowledge can save time and money. While DIY repairs can be cost-effective, professional repair services are often the safest choice for major issues. By using the right tools and choosing a reliable repair service, you can ensure your iPhone remains in top condition for years to come.
